Teach pendant development project tutorial
Introduction
In order to facilitate users to quickly get started with some simple operations of Qt, we will use the source code of a dispenser project as an example. This is a simple project, which mainly involves some communication operations, and the actual logic functions are few. As a simple introductory project, it's pretty good
· Creating a user management interface through development
The account management interface is very common in process. By assigning different permissions to different accounts, we can better manage user operations to avoid mistakes when using the product. In this chapter, we will use the interfaces provided by development to create a simple and universal account management interface.
Let's take the dispenser project as an example, first we double click on the ui file under Forms to enter the QT designer interface.


The account interface is mainly composed of the following components: Label Widget: commonly used to add text, titles, comments, etc. It can also be used in different forms like indicators based on the usage. ComboBox: a dropdown widget that can contain any number of selectable items. It allows switching between items using the setCurrentIndex() interface. In this example, it includes three elements: "Operator", "Technician" and "Admin". Line Edit input box: often used to read user input. Stacked Widget: a window interface that can switch between pages. Page navigation can be done using the setCurrentIndex() interface.
For example, the slot function of the operator button in the top right corner is as follows:

When we click the button, we will retrieve the current user information through the getAccount() interface. Based on different scenarios, we will navigate to the corresponding user type page to switch the display of the current account. Finally, we will switch the Stacked Widget to the user management page.
The two commonly used trigger signals in QComboBox are as follows:
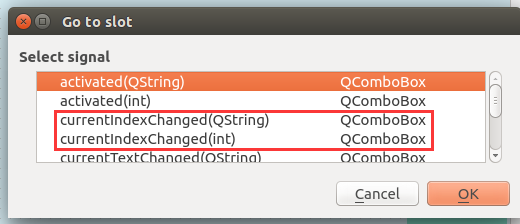
The parameter QString represents the name of the element in the widget, and int represents the index of the element. Let's take the QString type as an example to see its slot function:

When we switch accounts, the slot function is triggered. By comparing the current account with the switched account, we can hide the password input box when switching from a high-privilege user to a low-privilege user, and display the password input box when switching vice versa.
At this point, we already have a dropdown menu for switching accounts. The next step is to create the password input box. For the password input part, we will use the Line Edit widget. In the slot function of the confirmation button, we will read the value of the password and compare it with the preset password to determine its correctness. We have two options for the Line Edit: DigitalLineEdit, which comes with a numeric keypad, and LineEditWidget, which comes with a standard keyboard.

Here we use the interface for switching users:

We pass the elements in the dropdown menu, namely Operator/Technician/Admin, and the password on the Line Edit as parameters to this interface. At the same time, we check if the password is correct. If it is correct, we display a message indicating successful switching and modify the operational permissions of some widgets based on the current user's permission level, as shown below:

setEnabled(bool) is an interface that comes with QT, which is used to modify the operability of the widgets. At this point, we have completed the design of the user interface.
· Transmission, storage and reading of parameters
Each process contains various parameters, such as the dimensions of the workpiece, the position of the robot's origin, the speed of the robot's movement, and more. It's impractical to re-enter these parameters every time we use a robot process. Therefore, we package these parameters into a process number, allowing for quick switching between different parameter specifications by simply switching the process number. The image below shows a parameter interface containing various parameters for the dispensing process. Our goal is to enable the user to save these parameters on the controller side after inputting them on the teach pendant and generate a file to record these parameters. The parameters can then be directly retrieved for future use.

Before we start, let's briefly learn about a data exchange format, JSON. JSON (JavaScript Object Notation) is a lightweight data interchange format. It is based on a subset of ECMAScript (the European Computer Manufacturers Association script specification) and uses a text format that is completely independent of programming languages to store and represent data. Its concise and clear hierarchical structure makes JSON an ideal data exchange language. It is easy for humans to read and write, while also being easy for machines to parse and generate, effectively improving network transmission efficiency. (Source: Baidu Encyclopedia)
Most of our data is transmitted in Json format, such as the following slot function:

Json::Value root; //Create a Json object named root Json::FastWriter wt; //Create a Json fast write object named wt, the usage is: Json::FastWriter.write(Json::Value) root["act"] = "get_current_pos"; //Create an element named act in the root object with the value of the string "get_current_pos"
The advantage of JSON is that it allows for convenient and clear categorization of different parameters, facilitating packaging and transmission. Additionally, it offers many practical interfaces, which we will introduce one by one when we use them later on.
· Sending parameters from the teach pendant
Similar to the communication methods mentioned earlier, we also start with sending from the teach pendant in this example. Firstly, we add the following format of QList object in the public definition of the header file class. The usage of QList is similar to the vector container in C++, used for storing widget objects. When we need to perform batch operations on widgets of the same type, managing them with QList will be more convenient.

In cpp, we add the widgets related to the parameter page to the corresponding QList:

And below, we set their default states to be unmodifiable:

Next, let's look at the slot function for the modify button. When the button is named "Modify," we will change the widgets related to the parameters to be operable, and simultaneously change the button name to "Save".

When the button is named "Save," we first evaluate the validity of the user-input parameters. If the parameters provided by the user are not within the allowable range, an error will be reported and returned. The specific implementation is as follows:

The final step involves sending the parameters to the controller in JSON format. After the transmission is completed, all widgets are reverted to an unmodifiable state, and the "Save" button is changed back to "Modify".


It's important to note that in Qt, all characters on widgets are stored as QString objects. Therefore, before transmission, we need to convert them to the appropriate parameter format using functions like toInt(), toDouble(), or toStdString(). Incorrect parameter formats may lead to program crashes, which is a common reason for teach pendant program crashes. After filling in arbitrary values for the parameters and saving them, you can observe the output below, which shows the string communication sent in JSON format. This indicates that our parameters have been successfully sent to the controller, marking the completion of the first part of our parameter communication process.

Following the sequence of send-receive-send-receive, it is recommended to first review the controller's parameter reception section in the "Controller Development Routine Teaching" for better understanding.
· Receiving parameters on the teach pendant
In the next step, we will write the receiving part of the teach pendant. The receiving interface has been reserved in widgetmanager.cpp, we will do one more step and use it as a springboard to pass parameters to our settingparawidget.cpp

By using the protocol number as the condition in the if statement, we can clearly differentiate the usage of each protocol number. It is important to note that different components have different methods of displaying when receiving parameters. Here are a few commonly used methods:
ComboBox -> setCurrentIndex
Laber -> setText
LineEdit -> setText
In QT, all displayed characters are in the form of QString and cannot be directly used as int, double, or string formats. It is also not possible to directly use a Json::Value object as a parameter. Incorrect format conversion is a common cause of crashes. Here are some commonly used QString conversion methods: QString::number(int/double) for numeric types (in the image below, 'f' and 2 represent floating-point type with two decimal places). QString::fromStdString(string) for string types.

Among them, the setCheck for the last five IOs is a custom component, and you can try it out to see the specific effect. Finally, all you need to do is to add the instruction for obtaining parameters in the slot function of the button that jumps to the parameter interface.

At this step, we have completed the transmission, storage and reading of parameters. From now on, you can freely modify the controller's parameters on the teach pendant and see the changes take effect in real time.
Small exercise
- Try to create a parameter storage feature using the demo, preferably utilizing various components.
- Ponder how to leverage JSON nodes to implement multiple functionalities with only one protocol number.
- Feel free to explore the usage of the SwitchButton and create a small button widget to manipulate certain boolean-type parameters, such as some IO switches.
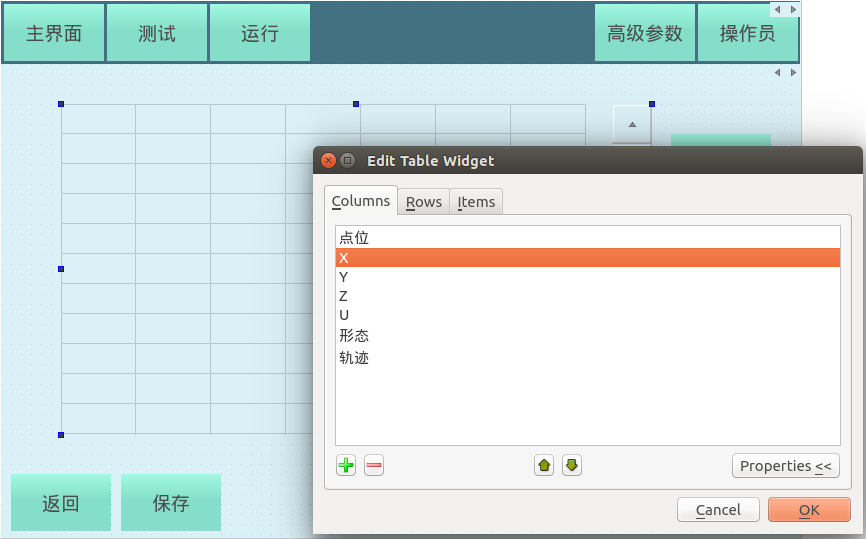
· Creating a point recording interface
In the previous section, we learned how to transmit parameters and save them. In this section, we will create a table for storing points with functionalities including adding, deleting, recording current point, and moving to that point. Points should include coordinates, form, and trajectory. The main widget used is QTabelWidget, where each small cell inside is referred to as an item. The properties of each item are similar to QLabel widgets and can also be replaced with other widgets.
Let's first look at the slot function for adding points:

The first part indexes from top to bottom to the first empty item in the row and checks if we have reached the maximum limit of 20 points. The second part assigns values to each item in this row and replaces two items with QComboBox widgets.
Next, let's look at the slot function for deleting points:

The slot function for deleting points can be divided into three parts: firstly, counting the current number of existing points; secondly, shifting all rows after the selected point that needs to be deleted up by one; and finally, deleting the last point. This method can be applied to the deletion operation of many interface designs with tables that require sequential arrangement, meaning starting from the selected row, moving all subsequent rows up by one, and then deleting the last row.
Next, let's look at the slot function for recovering points:

Based on the previous learning, this slot function is straightforward. It sends a string "recover_pos" to the controller. To prevent communication blockage caused by users clicking multiple times in a short period, I added a section here to disable this button after clicking. The button can only be clicked again after receiving a reply from the controller. Looking at the controller part, it is mainly responsible for sending the current robot points to the teach pendant upon receiving the request.
After receiving a reply from the controller, similar to the previous chapters, we only need to display the received data on the teach pendant.

The "Move here" function is also similar. It involves sending the selected point's data to the controller for robot control.

When saving, all parameters on the QTabelWidget are converted to Json format and sent to the controller for recording.

For the corresponding controller-side implementation, please refer to the "Controller Development Routine Teaching".
Small exercise
Create an IO detection interface: Through the previous study, we have basic knowledge of communication methods between the controller and teach pendant. Now, let's practice by creating a feature that can read IO signals in real-time and display them on the teach pendant interface. To achieve real-time IO signal reading, using a button to get IO signals won't be practical as clicking it every time would be cumbersome and wouldn't enable real-time updates. Thus, we will utilize a signal function called QTimer in Qt:

Here, _pGetIoInputStatusTimer is a QTimer object. These three lines create a 400ms timer and bind it to our slot function. QTimer can be controlled using start() and stop() methods. This setup allows us to start querying IO signals when entering the IO display page and stop it when exiting, thus optimizing memory usage. On the controller side, we use the NRC_ReadDigIn(int port) interface to read the corresponding IO signals and send them back to the teach pendant for display. You can explore the specific implementation independently, following a methodology similar to the initial hello communication.