Controller development project tutorial
Introduction
In order to facilitate users to quickly get started with some simple operations of Qt, we will use the source code of a dispenser project as an example. This is a simple project, which mainly involves some communication operations, and the actual logic functions are few. As a simple introductory project, it's pretty good
· The controller receives parameter communication and saves it locally
Before starting this chapter, please refer to "Teach Pendant Development Tutorial".
There are three main functions related to parameters on the controller side:
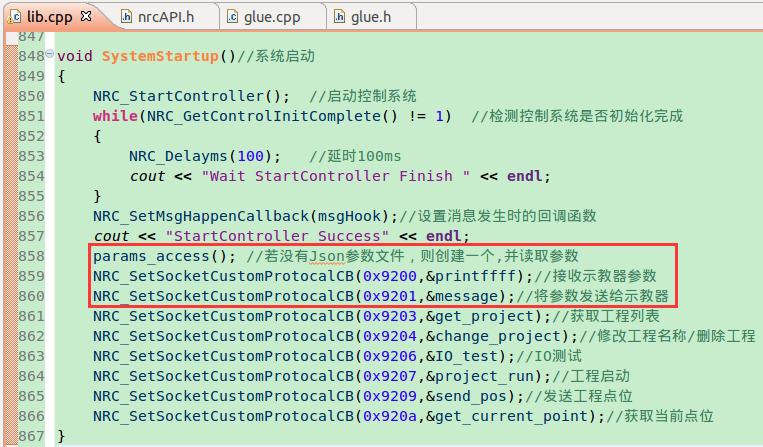
The core idea is to detect whether there is a local parameter file every time the program starts, and create one if it does not exist, and assign default values to the parameters. At the same time, whenever the teach pendant modifies the parameters, synchronously modify the local parameter file while reading the new parameters, and when the teach pendant sends a request, read the parameters of the local parameter file and pass it to the teach pendant
Let's look at the first function first. Here we mainly use fsteam and ofsteam interfaces, which require header files <iosteam> and <fsteam> respectively, the former is used to read the file and return whether it exists, and the latter is used to manipulate the file content


When we execute the program, a parameter file will be generated on the controller side

At this point we have stored the parameters in a Json object named root, regardless of whether the parameter file exists locally or not, but root is a temporary object and we have to pass these parameters to global variables to make it easier for us to call them in the process implementation. In this step, we created some local variables as transit, and assigned these parameters to global variables through an interface


Among them, glue_param is a structure of the Glue class. After initialization, the variables in the class are global in nature. The computer will allocate memory space for them at the time of initialization, and they can be used anywhere in the program afterwards. It is very convenient to call and modify

When the controller receives the message communication sent by the teach pendant, we only need to write the parameters sent by the teach pendant into the local parameter file as when the parameters were initialized, and then call param_access() again to read the parameters in the parameter file to global variables
In the figure below, we use the Json::Reader in the Json library to create an object named reader. Its function is to read the string written in Json format into the Json::Value object. The method of use is:
Json::Reader.parse(string,Json::Value)
As shown in the figure, we also noticed that X_coord, Y_coord, Z_coord, and U_coord are all subtags of origin, so they belong to the origin tag when saving

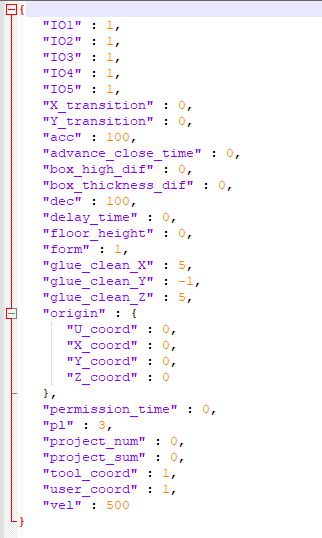
Use the ofsteam library to save these parameters in glueParam.json

In this program, Json::StyledWriter is similar to the Json::FastWriter mentioned above. Its function is to convert the Json format into string and automatically typeset it, so that after saving it as a local file, you can directly open the file to see the value of each parameter intuitively as follows
After the controller reads the parameters, the data also needs to be synchronized to the teach pendant. This step is often used during parameter initialization. After the controller reads the parameters from the local parameter configuration file, the data needs to be synchronized to the teach pendant. The core idea is that the teach pendant sends a parameter request to the controller, and the controller sends the local parameters to the teach pendant in Json format after receiving the request, and the teach pendant displays the parameters on the user interface after receiving them


In the next step, we will write the receiving part of the teach pendant.
· Create a point recording interface
After the teach pendant sends us a request to obtain the current position, the controller needs to issue the current position as shown in the following diagram:
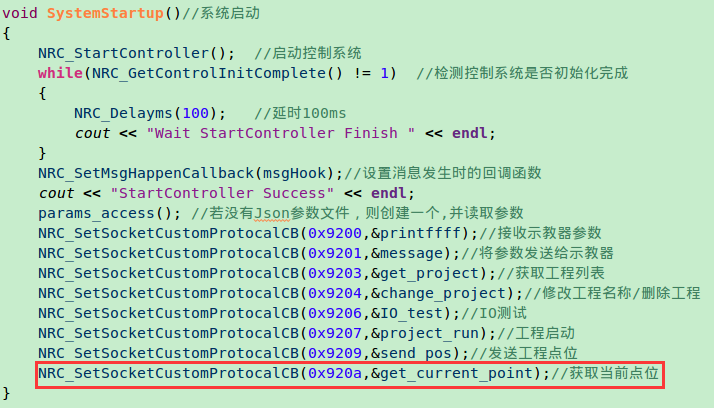

Here we use the interface
NRC_GetCurrentPos(NRC_COORD coord, NRC_Position position)
For specific usage, you can check the header file by yourself, and its function is to obtain the coordinates of the current robot. After we send the points to the teach pendant, the teach pendant will overlay these points onto the corresponding items
The "Move here" function is implemented as follows

· Process realization
After doing so much preparation work, we should try to make the robot move. If the controller is connected to a physical robot, please make sure that the robot settings such as robot type and DH parameters are correct and can realize normal jogging before proceeding to this section, otherwise it may cause a collision accident. For simple controller movement, please refer to "Controller Basic Motion Tutorial"
Here we mainly introduce two commonly used motion realization forms in the development process, one is the job file mode, the other is the append operation mode. The no-job operation mode is a special form of job file, we will not introduce it here, users can study it by themselves
· Job file form
The job file form is equivalent to robot programming in our popular sense, that is, to generate a file containing various robot motion and logic judgment instructions, so that every time we only need to execute this file, the robot will move in order according to the instructions in the file. The advantage is that programming is simple, easy to use, easy to transfer and can be modified directly on the teach pendant side, the disadvantage is that it is not flexible enough when dealing with some complex logic judgments. Please try to use the following interface to generate or open a job file. The generated job file will be saved under the /robot/job file in the controller. Operating the job file directly with the code is equivalent to programming the job file on the teach pendant, and you can also use the teach pendant to open the job file


Here we see that the point parameter is NRC_Position &target, which contains the coordinate system, point, and attitude information of the coordinates. For details, please refer to the interface description

There is also a commonly used interface, i.e. GetCurrentPos, because in many processes, the position of the point is not absolute but relative, which requires us to obtain the current coordinate position and add the corresponding deviation value to move, so you need to use this interface

It is important to note that these instructions are insertion instructions rather than motion instructions. When the job file is running, the instructions have been inserted, so our usual logical judgment will not take effect. For example, if you want to "make the robot move to a point through an IO judgment", the following form is not possible

The actual effect of this code snippet is that if the IO1 input is read as 1, then insert a MOVJ instruction into the job file, but this is different from our original intention, and it should actually be written in the following form

If IO5 input is 1, move to Pos1, otherwise delay 0.5s It can be seen that the job file instructions can also handle some simple logical judgments, but for complex logical judgments, the logic of the entire code will be very cumbersome, so when making complex processes, we recommend using the append operation mode
· Append operation mode
Another robot motion method is append operation mode. The advantage of append operation mode is that you can insert logical judgments between various motion instructions, and all of its instructions are in real time, i.e., when the program reaches the corresponding code, the robot will perform the corresponding motion, and it does not need to wait for the robot to finish executing the previous instruction, and when multiple instructions are inserted in a short period of time, the robot will execute them in order. Compared to the job file, the append operation mode is more flexible, but it does not generate job files, nor does it display on the teach pendant. Modifications cannot be made on the teach pendant.
To use the append operation mode, you need to turn on the append operation mode first, and the implementation method is as follows


Based on the characteristics of the append operation mode, we can insert logical judgment blocking in the middle of the motion instructions, such as the following example

The actual effect of this code is that when IO1 does not read the input signal and the end flag is not triggered, the program is blocked, and when the IO1 signal is triggered, the MOVJ movement is performed. Compared with the job file form, this mode that can add various logic judgments between motion instructions is more flexible and easy to implement more complex logic
Small exercise
- Make the robot move with the tutorial on the official website
- Try to use the job file form and the append operation mode to realize a function of controlling the robot movement through IO signals